DJI SDK Tutorial: Creating a Media Manager Application

DJI SDK Tutorial: Creating a Media Manager Application

Jan 29, 2022

In this tutorial, you will learn how to use the DJIMediaManager to interact with the file system on the SD card of the aircraft's camera. By the end of this tutorial, you will have an app that you can use to preview photos, play videos, download or delete files and so on.

In order for our app to manage photos and videos, however, it must first be able to take and record them. Fortunately, by using DJI iOS UX SDK, you can implement shooting photos and recording videos functionalities easily with standard DJI Go UIs.

You can download the tutorial's final sample project from this Github Page.

See this Github Page for an Objective C version.

We use Mavic Pro and iPad Air as an example to make this demo. For more details of customizing the layouts for iPhone devices, please check the tutorial's Github Sample Project.

Application Activation and Aircraft Binding in China

For DJI SDK mobile application used in China, it's required to activate the application and bind the aircraft to the user's DJI account.

If an application is not activated, the aircraft not bound (if required), or a legacy version of the SDK (< 4.1) is being used, all camera live streams will be disabled, and flight will be limited to a zone of 100m diameter and 30m height to ensure the aircraft stays within line of sight.

To learn how to implement this feature, please check this tutorial Application Activation and Aircraft Binding.

Implementing DJI Go Style Default Layout

Importing DJI SDK and UX SDK with CocoaPods

To create a new project in Xcode, choose Single View Application template for your project and press "Next", then enter "MediaManagerDemo" in the Product Name field and keep the other default settings. Once the project is created, import the DJI SDK and DJI UX SDK.

You can check the Getting Started with DJI UX SDK tutorial to learn how to import the DJISDK.framework and DJIUXSDK.framework into your Xcode project.

Importing the DJIWidget

You can check the Creating a Camera Application tutorial to learn how to download and import the DJIWidget into your Xcode project.

Working on the MainViewController and DefaultlayoutViewController

You can check this tutorial's Github Sample Code to learn how to implement the MainViewController, do SDK registration, update UI and show alert views to inform users when a DJI product is connected or disconnected. Also, you can learn how to implement the shoot photo and record video features with standard DJI Go UIs by using DUXDefaultLayoutViewcontroller of DJI UX SDK from the Getting Started with DJI UX SDK tutorial.

If everything goes well, you can see the live video feed and test the shoot photo and record video features like this:

Congratulations! We can move forward now.

Working on the UI of the Application

Now, create a new file, choose the "Swift file" template and name it as "MediaManagerViewController". We will use it to implement the Media Manager features.

Open the Main.storyboard file and drag and drop a new "View Controller" object from the Object Library and set its "Class" value as MediaManagerViewController.

Drag and drop a new "Container View" object in the MediaManagerViewController and set its ViewController's "Class" value as DUXFPVViewController, which contains a DUXFPVView and will show the video playback.

Drag and drop a UIImageView object on top of the "Container View" and hide it by default. We will use it to show the downloaded photo.

Drag and drop eleven UIButton objects, one UITextField, one UITableView and a UIActivityIndicatorView and place them in the following positions:
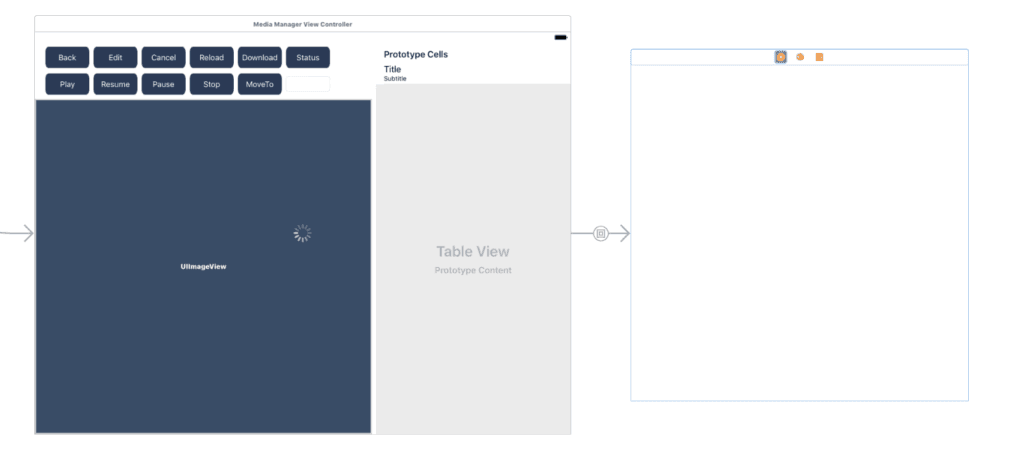
The layout of the UI elements is a bit complicated, for more details of the configuration, please check the Main.storyboard in this tutorial's Github Sample Project.

Lastly, place a UIButton on the bottom right corner of the DefaultLayoutViewController view and create a segue to the MediaManagerViewController when the user presses the button.

If everything goes well, you should see the whole storyboard layout like this:

Once you finish the above steps, open the "DefaultLayoutViewController.swift" file and replace the content with the following:

import Foundation
import DJISDK
import DJIWidget

class MediaManagerViewController : UIViewController, DJICameraDelegate, DJIMediaManagerDelegate, UITableViewDelegate, UITableViewDataSource {

@IBOutlet weak var cancelBtn: UIButton!
@IBOutlet weak var displayImageView: UIImageView!
@IBOutlet weak var editBtn: UIButton!
@IBOutlet weak var loadingIndicator: UIActivityIndicatorView!
@IBOutlet weak var mediaTableView: UITableView!
@IBOutlet weak var positionTextField: UITextField!
@IBOutlet weak var reloadBtn: UIButton!
@IBOutlet weak var videoPreviewContainerView: UIView!

var videoPreviewView: UIView?
var previewerAdapter: VideoPreviewerAdapter?

var statusView : DJIScrollView?
var renderView : DJIRTPlayerRenderView?

override var prefersStatusBarHidden : Bool {
    return false
}

override func viewWillAppear(_ animated: Bool) {
    super.viewWillAppear(animated)
    let optionalCamera = fetchCamera()
    guard let camera = optionalCamera else {
        print("Couldn't fetch camera")
        return
    }
    camera.delegate = self
    self.mediaManager = camera.mediaManager
    self.mediaManager?.delegate = self
    camera.setMode(DJICameraMode.mediaDownload) { (error : Error?) in
        if let error = error {
            print("setMode failed: %@", error.localizedDescription)
        }
    }
    self.loadMediaList()

    if self.hasPlaybackFor(cameraName: camera.displayName) {
        self.setupRenderViewPlaybacker()
    } else {
        self.setupVideoPreviewer()
    }
}

func setupRenderViewPlaybacker() {
    //Support Video Playback for Phantom 4 Professional, Inspire 2
    var encoderType = H264EncoderType._unknown
    if let camera = fetchCamera() {
        if camera.displayName == DJICameraDisplayNamePhantom4ProCamera ||
           camera.displayName == DJICameraDisplayNamePhantom4AdvancedCamera ||
           camera.displayName == DJICameraDisplayNameX4S ||
           camera.displayName == DJICameraDisplayNameX5S { //Phantom 4 Professional, Phantom 4 Advanced and Inspire 2
            encoderType = H264EncoderType._H1_Inspire2
        }
    }
    self.renderView = DJIRTPlayerRenderView(decoderType: LiveStreamDecodeType.vtHardware,
                                            encoderType: encoderType)
    guard self.renderView != nil else {
        return
    }
    self.renderView!.frame = self.videoPreviewContainerView.bounds
    self.videoPreviewContainerView.addSubview(self.renderView!)
    self.renderView?.isHidden = true
}

func setupVideoPreviewer() {
    self.videoPreviewView = UIView(frame: self.videoPreviewContainerView.bounds)
    self.videoPreviewContainerView.addSubview(self.videoPreviewView!)
    DJIVideoPreviewer.instance().type = DJIVideoPreviewerType.autoAdapt
    DJIVideoPreviewer.instance()?.start()
    DJIVideoPreviewer.instance()?.reset()
    DJIVideoPreviewer.instance()?.setView(self.videoPreviewView)
    self.previewerAdapter = VideoPreviewerAdapter()
    self.previewerAdapter?.start()

    #if targetEnvironment(simulator)
    DJIVideoPreviewer.instance().enableHardwareDecode = true
    #endif

    self.previewerAdapter?.setupFrameControlHandler()
}

func hasPlaybackFor(cameraName:String) -> Bool {
    return cameraName == DJICameraDisplayNamePhantom4Camera ||
           cameraName == DJICameraDisplayNamePhantom4ProCamera ||
           cameraName == DJICameraDisplayNamePhantom4AdvancedCamera ||
           cameraName == DJICameraDisplayNameX4S ||
           cameraName == DJICameraDisplayNameX5S ||
           cameraName == DJICameraDisplayNameX7 ||
           cameraName == DJICameraDisplayNameX3 ||
           cameraName == DJICameraDisplayNameXT ||
           cameraName == DJICameraDisplayNameZ3 ||
           cameraName == DJICameraDisplayNameZ30 ||
           cameraName == DJICameraDisplayNameXT2Visual ||
           cameraName == DJICameraDisplayNameXT2Thermal ||
           cameraName == DJICameraDisplayNamePhantom3AdvancedCamera
}

override func viewWillDisappear(_ animated: Bool) {
    super.viewWillDisappear(animated)
}


override func viewDidLoad() {
    super.viewDidLoad()
    self.initData()
}

//MARK: - Custom Methods
func initData() {
    self.mediaList = [DJIMediaFile]()
    self.cancelBtn.isEnabled = false
    self.reloadBtn.isEnabled = false
    self.editBtn.isEnabled = false

    self.fileData = nil
    self.selectedMedia = nil
    self.previousOffset = 0

    self.statusView = DJIScrollView.viewWith(viewController: self)
    self.statusView?.isHidden = true
}

//MARK: - IBAction Methods
@IBAction func backBtnAction(_ sender: Any) {
    self.navigationController?.popViewController(animated: true)
}


@IBAction func editBtnAction(_ sender: Any) {
    self.mediaTableView.setEditing(true, animated: true)
    self.cancelBtn.isEnabled = true
    self.editBtn.isEnabled = false
}

@IBAction func cancelBtnAction(_ sender: Any) {
    self.mediaTableView.setEditing(false, animated: true)
    self.editBtn.isEnabled = true
    self.cancelBtn.isEnabled = false
}

@IBAction func statusBtnAction(_ sender: Any) {
    self.statusView?.isHidden = false
    self.statusView?.show()
}

@IBAction func reloadBtnAction(_ sender: Any) {

}

@IBAction func downloadBtnAction(_ sender: Any) {

}

@IBAction func playBtnAction(_ sender: Any) {

}

@IBAction func resumeBtnAction(_ sender: Any) {

}
@IBAction func pauseBtnAction(_ sender: Any) {

}

@IBAction func stopBtnAction(_ sender: Any) {

}

@IBAction func moveToPositionAction(_ sender: Any) {

}

@IBAction func showStatusBtnAction(_ sender: Any) {

}
}

In the code above, we implement the following things:

  1. We define the IBOutlet properties for the UI elements, like UIButton, UITableView, UITextField, etc.

  2. We implement the viewDidLoad method, and invoke the initData method to disable the deleteBtncancelBtnreloadBtn and editBtn initially.

  3. We implement the IBAction methods for all the UIButtons. For the backBtnAction method, we invoke the popViewControllerAnimated method of UINavigationController to go back to the DefaultLayoutViewController.

  4. For the editBtnAction method, we make mediaTableView enter editing mode by invoking setEditing:animated:, enable deleteBtn, enable cancelBtn and disable editBtn.

  5. For the cancelBtnAction method we disable the editing mode of mediaTableView, enable the editBtn button, disable deleteBtn and disable cancelBtn. We will implement the other IBAction methods later.

Switching to Media Download Mode

In order to preview, edit or download the photos or videos files from the DJICamera, you need to use the DJIPlaybackManager or DJIMediaManager of DJICamera. Here, we use DJIMediaManager.

Now, create a property of type DJIMediaManager and implement the viewWillAppear: and viewWillDisappear: methods as shown below:

weak var mediaManager : DJIMediaManager?

override func viewWillAppear(_ animated: Bool) {
    super.viewWillAppear(animated)
    let optionalCamera = fetchCamera()
    guard let camera = optionalCamera else {
        print("Couldn't fetch camera")
        return
    }
    camera.delegate = self
    self.mediaManager = camera.mediaManager
    self.mediaManager?.delegate = self
    camera.setMode(DJICameraMode.mediaDownload) { (error : Error?) in
        if let error = error {
            print("setMode failed: %@", error.localizedDescription)
        }
    }
}

override func viewWillDisappear(_ animated: Bool) {
    super.viewWillDisappear(animated)

    guard let camera = fetchCamera() else { return }

    camera.setMode(DJICameraMode.shootPhoto, withCompletion: { (error: Error?) in
        if let error = error {
            showAlertWith("Set CameraWorkModeShootPhoto Failed, \(error.localizedDescription)")
        }
    })

    guard let cameraDelegate = camera.delegate else {
        return
    }
    if cameraDelegate.isEqual(self) {
        camera.delegate = nil
        self.mediaManager?.delegate = nil
    }
}
  1. In the viewWillAppear method, we invoke the fetchCamera method of DemoUtility class to fetch the DJICamera object. Then check if the camera is nil, if not set its delegate as MediaManagerViewController, also initialize the mediaManager and set its delegate as MediaManagerViewController. Furthermore, invoke DJICamera's setMode:withCompletion: method with the DJICameraMode.shootPhoto param to switch the camera mode to media download mode.

  2. Similarly, in the viewWillDisappear method, we also invoke DJICamera's setMode:withCompletion: method with DJICameraModeShootPhoto to switch the camera mode to shoot photo mode. Then reset DJICamera and DJIMediaManager's delegates so when the user enters the MediaManagerViewController, the DJICamera will switch to media download mode automatically and when the user exits back to the DefaultLayoutViewController, the DJICamera will switch to shoot photo mode.

Refreshing Media File List

Once we have finished the steps above, we can start to fetch the media files list from the Camera SD card and show them on the tableView.

Create the following properties and initialize them in the initData method:

var mediaList : [DJIMediaFile]?
var selectedCellIndexPath : IndexPath?

func initData() {
    self.mediaList = [DJIMediaFile]()
    ...
}

Next, create two new methods: loadMediaList and updateMediaList: and invoke the loadMediaList method at the bottom of viewWillAppear: method and in the reloadBtnAction: IBAction method:

override func viewWillAppear(_ animated: Bool) {
    ...
    self.loadMediaList()
}

@IBAction func reloadBtnAction(_ sender: Any) {
    self.loadMediaList()
}

func loadMediaList() {
    self.loadingIndicator.isHidden = false
    self.view.bringSubviewToFront(self.loadingIndicator)
    if self.mediaManager?.sdCardFileListState == DJIMediaFileListState.syncing ||
       self.mediaManager?.sdCardFileListState == DJIMediaFileListState.deleting {
        print("Media Manager is busy. ")
    } else {
        self.mediaManager?.refreshFileList(of: DJICameraStorageLocation.sdCard, withCompletion: {[weak self] (error:Error?) in
            if let error = error {
                print("Fetch Media File List Failed: %@", error.localizedDescription)
            } else {
                print("Fetch Media File List Success.")
                if let mediaFileList = self?.mediaManager?.sdCardFileListSnapshot() {
                    self?.updateMediaList(mediaList:mediaFileList)
                    self?.loadingIndicator.isHidden = true

                }
            }
        })
    }
}

func updateMediaList(mediaList:[DJIMediaFile]) {
    self.mediaList?.removeAll()
    self.mediaList?.append(contentsOf: mediaList)

    if let mediaTaskScheduler = fetchCamera()?.mediaManager?.taskScheduler {
        mediaTaskScheduler.suspendAfterSingleFetchTaskFailure = false
        mediaTaskScheduler.resume(completion: nil)
        self.mediaList?.forEach({ (file:DJIMediaFile) in
            if file.thumbnail == nil {
                let task = DJIFetchMediaTask(file: file, content: DJIFetchMediaTaskContent.thumbnail) {[weak self] (file: DJIMediaFile, content: DJIFetchMediaTaskContent, error: Error?) in
                    self?.mediaTableView.reloadData()
                }
                mediaTaskScheduler.moveTask(toEnd: task)
            }
        })
    }
    self.reloadBtn.isEnabled = true
    self.editBtn.isEnabled = true
}

The code above implements:

  1. In the loadMediaList method, we first show the loadingIndicator and check the fileListState of the DJIMediaManager. If the state is DJIMediaFileListStateSyncing or DJIMediaFileListStateDeleting, we show a log to inform users that the media manager is busy. For other values, we invoke the refreshFileList(ofStorageLocation: withCompletion:) method of DJIMediaManager to refresh the file list from the SD card. In the completion closure, if there is no error, we get a copy of the current file list by invoking the sdCardFileListSnapshot method of DJIMediaManager and initialize the mediaFileList variable. Then invoke the updateMediaList: method and pass the mediaFileList. Finally, hide the loadingIndicator since the operation of refreshing the file list has finished.

  2. In the updateMediaList: method, we remove all the objects in the mediaList array and add new objects to it from the mediaList array. Next, create a mediaTaskScheduler variable and set it to the taskScheduler property of DJIMediaManager. Then, set DJIFetchMediaTaskScheduler's suspendAfterSingleFetchTaskFailure property to false to the of to prevent it from suspending the scheduler when an error occurs during the execution. Moreover, invoke the resumeWithCompletion method of DJIFetchMediaTaskScheduler to resume the scheduler, which will execute tasks in the queue sequentially.Create a for loop to loop through all the DJIMediaFile variables in the mediaList array and invoke the taskWithFile:content:andCompletion: method of DJIFetchMediaTaskScheduler by passing the file variable and DJIFetchMediaTaskContentThumbnail value to ask the scheduler to download the thumbnail of the media file.In the completion block, we invoke the reloadData method of UITableView to reload everything in the table view. After that, invoke the moveTaskToEnd method to push the task to the back of the queue and be executed after the executing task is complete.

Lastly, we enable the reloadBtn and editBtn buttons.

Once you finish the steps above, you should implement the following UITableView methods:

func numberOfSections(in tableView: UITableView) -> Int {
    return 1
}
func tableView(_ tableView: UITableView, numberOfRowsInSection: Int) -> Int {
    return self.mediaList?.count ?? 0
}
func tableView(_ tableView: UITableView, cellForRowAt indexPath: IndexPath) -> UITableViewCell {
    let cell = tableView.dequeueReusableCell(withIdentifier: "mediaFileCell", for:indexPath)
    if self.selectedCellIndexPath == indexPath {
        cell.accessoryType = UITableViewCell.AccessoryType.checkmark
    } else {
        cell.accessoryType = UITableViewCell.AccessoryType.none
    }
    if let media = self.mediaList?[indexPath.row] {
        cell.textLabel?.text = media.fileName
        var detailText = "Create Date: \(media.timeCreated)"
        detailText.append(String(format: " Size: %0.1fMB", Double(media.fileSizeInBytes) / 1024.0 / 1024.0))
        detailText.append(" Duration: \(media.durationInSeconds)")
        detailText.append(" CustomInfo: \(media.customInformation ?? "none")")
        cell.detailTextLabel?.text = detailText
        if let thumbnail = media.thumbnail {
            cell.imageView?.image = thumbnail
        } else {
            cell.imageView?.image = UIImage(named: "dji.png")
        }
    }
    return cell
}

In the code above, we implement the following features:

  1. Return 1 as the section number of the table view.

  2. Return the count value of the mediaList array as the number of rows in section.

  3. If the UITableViewCell is selected, set its accessoryType as UITableViewCellAccessoryCheckmark to show a checkmark on the right side of the table view cell, otherwise, set the accessoryType as UITableViewCellAccessoryNone to hide the checkmark.

Next, get the DJIMediaFile object in the self.mediaList array by using the indexPath.row index. Lastly, update the textLabeldetailTextLabel and imageView properties of table view cell according to the DJIMediaFile object. You can get the "dji.png" file from the tutorial's Github Sample project.

Add Helper files from Demo

Add the following files from the tutorial's final product to your project(TODO: link)

  • VideoPreviewerAdapter.swift

  • DecodeImageCalibrateLogic.swift

  • DJIScrollView.swift

  • DJIScrollView.xib

  • AlertView.swift

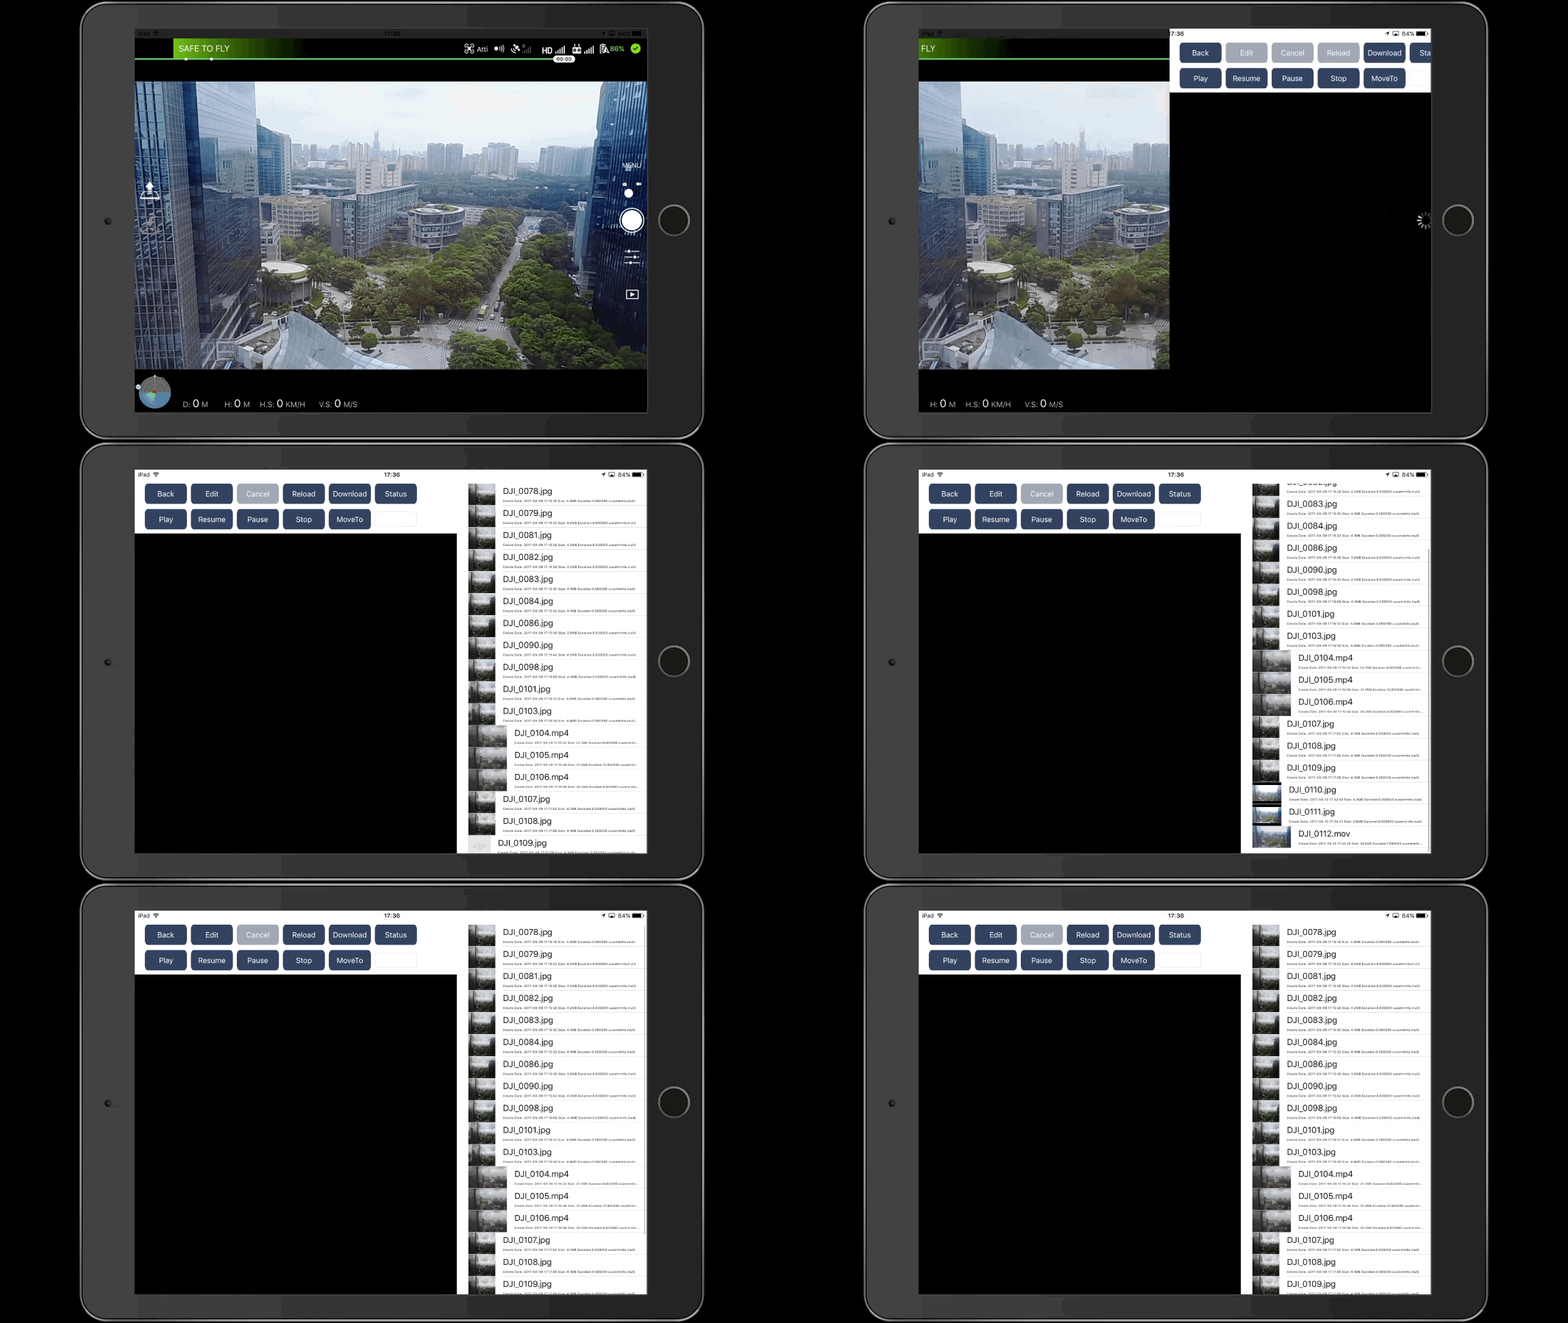
Now, to build and run the project, connect the demo application to a supported DJI product (Please check the Run Application for more details) and enter the MediaManagerViewController, you should be able to see something similar to the following screenshot:
Downloading and Editing the Media Files

After showing all the media files in the table view, we can start to implement the features of downloading and deleting media files.

Now, continue to create the following properties:

var statusAlertView : AlertView?
var selectedMedia : DJIMediaFile?
var previousOffset = UInt(0)
var fileData :

Next, initialize the properties in the initData method:

func initData() {
    ...
    self.fileData = nil
    self.selectedMedia = nil
    self.previousOffset = 0
}

Moreover, implement the table View delegate method as shown below:

func tableView(_ tableView: UITableView, didSelectRowAt indexPath: IndexPath) {
    if self.mediaTableView.isEditing {
        return
    }
    self.selectedCellIndexPath = indexPath
    if let currentMedia = self.mediaList?[indexPath.row] {
        if currentMedia !== self.selectedMedia {
            self.previousOffset = 0
            self.selectedMedia = currentMedia
            self.fileData = nil
        }
    }
    tableView.reloadData()
}

In the code above, we assign the selectedCellIndexPath property to the indexPath value. Then get the current selected currentMedia object from the mediaList array using the indexPath param of this method. Reset the downloaded file data and data offset value(for tracking file download progress) if the currentMedia object isn't the same as self.selectedMedia property.

Once you finish the steps above, we continue to implement the downloadBtnAction: method as shown below:

@IBAction func downloadBtnAction(_ sender: Any) {
    guard self.selectedMedia != nil else {
        return
    }
    let isPhoto = self.selectedMedia?.mediaType == DJIMediaType.JPEG || self.selectedMedia?.mediaType == DJIMediaType.TIFF
    if (self.statusAlertView == nil) {
        let message = "Fetch Media Data \n 0.0"
        self.statusAlertView = AlertView.showAlertWith(message: message, titles: ["Cancel"], actionClosure:{[weak self] (buttonIndex: Int) -> () in
            if (buttonIndex == 0) {
                self?.selectedMedia?.stopFetchingFileData(completion: {[weak self] (error: Error?) in
                    self?.statusAlertView = nil
                })
            }
        })
    }
    self.selectedMedia?.fetchData(withOffset: previousOffset, update: DispatchQueue.main, update: {[weak self] (data:Data?, isComplete: Bool, error:Error?) in
        if let error = error {
            self?.statusAlertView?.update(message: "Download Media Failed: \(error.localizedDescription)")
            if let unwrappedSelf = self {
                unwrappedSelf.perform(#selector(unwrappedSelf.dismissStatusAlertView), with: nil, afterDelay: 2.0)
            }
        } else {
            if isPhoto {
                if let data = data {
                    if self?.fileData == nil {
                        self?.fileData = data
                    } else {
                        self?.fileData?.append(data)
                    }
                }
            }
            if let data = data, let self = self {
                self.previousOffset = self.previousOffset + UInt(data.count)
            }
            if let selectedFileSizeBytes = self?.selectedMedia?.fileSizeInBytes {
                let progress = Float(self?.previousOffset ?? 0) * 100.0 / Float(selectedFileSizeBytes)
                self?.statusAlertView?.update(message: String(format: "Downloading: %0.1f%%", progress))
                if isComplete {
                    self?.dismissStatusAlertView()
                    if (isPhoto) {
                        self?.showPhotoWithData(data: self?.fileData)
                        self?.savePhotoWithData(data: self?.fileData)
                    }
                }
            }
        }
    })
}

In the code above, we implement the following features:

  1. We first create a variable isPhoto and assign its value by checking the mediaType of the selected DJIMediaFile. For more details on the DJIMediaType enum, please check "DJIMediaFile.h".

  2. Next, if the statusAlertView is nil, we initialize it by invoking DJIAlertView's showAlertViewWithMessage:titles:action: method. Here we create an alertView with one button named "Cancel". If user presses the "Cancel" button of the alertView, we invoke DJIMediaFile's stopFetchingFileDataWithCompletion: method to stop the fetch file task.

  3. Additionally, invoke DJIMediaFile's fetchFileDataWithOffset:updateQueue:updateBlock: method to fetch the media file's full resolution data from the SD card. The full resolution data could be an image or video. Inside the completion closure, if there is an error, update the message of the statusAlertView to inform users and dismiss the alert view after 2 seconds. If there is no error and the media file is a photo, initialize the fileData property with the received data or append data to it if already initialized. Only photo saving has been implemented here.

Next, accumulate the value of the previousOffset property by adding the length of the data param. Calculate the percentage of the current download progress and assign the value to the progress variable. Also, update the message of statusAlertView to inform users of the download progress. Furthermore, check if the download has completed and dismiss the alert view.

Lastly, if the media file is a photo, invoke the showPhotoWithData: and savePhotoWithData: methods to show the full resolution photo and save it to the iOS Photo Library.

You can check the implementations of the showPhotoWithData: and savePhotoWithData: methods below:

func showPhotoWithData(data:Data?) {
    if let data = data {
        self.displayImageView.image = UIImage(data: data)
        self.displayImageView.isHidden = false
    }
}
//MARK: - Save Download Images
func savePhotoWithData(data:Data?) {
    if let data = data {
        let tmpDir = NSTemporaryDirectory() as NSString
        let tmpImageFilePath = tmpDir.appendingPathComponent("tmpimage.jpg")
        let url = URL(fileURLWithPath:tmpImageFilePath)
        do {
            try data.write(to: url)
        } catch {
            print("failed to write data to file. Error: \(error)")
        }
        guard let imageURL = URL(string: tmpImageFilePath) else {
            print("Failed to load a filepath to save to")
            return
        }
        PHPhotoLibrary.shared().performChanges {
            PHAssetChangeRequest.creationRequestForAssetFromImage(atFileURL: imageURL)
        } completionHandler: { [weak self] (success:Bool, error: Error?) in
            self?.imageDidFinishSaving(error: error)
            print("success = \(success), error = \(error?.localizedDescription ?? "no")")
        }
    }
}
//TODO: test this- never called in previous tests...
func imageDidFinishSaving(error:Error?) {
    var message = ""
    if let error = error {
        //Show message when save image failed
        message = "Save Image Failed! Error: \(error.localizedDescription)"
    } else {
        //Show message when save image successfully
        message = "Saved to Photo Album";
    }
    if self.statusAlertView == nil {
        self.statusAlertView = AlertView.showAlertWith(message:message, titles:["Dismiss"], actionClosure:{[weak self] (buttonIndex:Int) in
            if buttonIndex == 0 {
                self?.dismissStatusAlertView()
            }
        })
    }
}

In the code above, we implement the following features:

  1. In the showPhotoWithData: method, if the data is not nil, create a UIImage object from it. Then check if the created image is not nil and show it in the displayImageView.

  2. Similarly, in the savePhotoWithData: method, we create a UIImage object from the data param and invoke the UIImageWriteToSavedPhotosAlbum() method to save the image to the photos album.

  3. In imageDidFinishSaving(error:), we first create a String object and set its value by checking for an error. Next, show the statusAlertView to inform the users of the message and dismiss the alert view when the users press on the Dismiss button.

Once you have finished the steps above, we can continue to implement the feature of deleting media files. Here we should implement the delegate methods of UITableView as shown below:

func tableView(_ tableView: UITableView, canEditRowAt indexPath: IndexPath) -> Bool {
    return true
}
func tableView(_ tableView: UITableView, commit editingStyle: UITableViewCell.EditingStyle, forRowAt indexPath: IndexPath) {
    if let currentMedia = self.mediaList?[indexPath.row] {
        self.mediaManager?.delete([currentMedia], withCompletion: { (failedFiles: [DJIMediaFile], error: Error?) in
            if let error = error {
                showAlertWith("Delete File Failed: \(error.localizedDescription)")
                for media:DJIMediaFile in failedFiles {
                    print("%@ delete failed",media.fileName)
                }
            } else {
                showAlertWith("Delete File Successfully")
                self.mediaList?.remove(at: indexPath.row)
                self.mediaTableView.deleteRows(at: [indexPath], with: UITableView.RowAnimation.left)
            }
        })
    }
}

The code above implements:

  1. In the tableView:canEditRowAtIndexPath: method, return true to allow the user to delete the table view cell with a swipe gesture.

  2. In the tableView:commitEditingStyle:forRowAtIndexPath: method, we get the currentMedia object from the mediaList array. Next, invoke the deleteFiles:withCompletion: method of DJIMediaManager to delete the selected media file. Inside the completion block, if there is an error, show an alert view to inform user of the error description. If not, remove the deleted media file from the mediaList array and invoke the deleteRowsAtIndexPaths:withRowAnimation: method of mediaTableView to remove the table view cell too.

Now build and run the project, connect the demo application to a Mavic Pro and enter the MediaManagerViewController, try to download an image file from the SD card, display and save it to the photos album. Also, try to swipe right on the table view cell and delete the media file from the table view. If everything goes well, you should be able to see something similar to the following gif animation:

Working on the Video Playback

After you finish the steps above, you should know how to download and display the image media file using DJIMediaManager. Now let's continue to implement the Video Playback features.

Now, implement the following IBAction methods:

@IBAction func playBtnAction(_ sender: Any) {
    self.displayImageView.isHidden = true
    self.renderView?.isHidden = false
    if let mediaType = self.selectedMedia?.mediaType {
        if (mediaType == DJIMediaType.MOV || mediaType == DJIMediaType.MP4) {
            if let selectedMedia = self.selectedMedia {
                self.positionTextField.placeholder = "\(Int(selectedMedia.durationInSeconds)) sec"
                self.mediaManager?.playVideo(selectedMedia, withCompletion: { (error:Error?) in
                    if let error = error {
                        showAlertWith("Play Video Failed: \(error.localizedDescription)")
                    }
                })
            }
        }
    }
}
@IBAction func resumeBtnAction(_ sender: Any) {
    self.mediaManager?.resume(completion: { (error:Error?) in
        if let error = error {
            showAlertWith("Resume failed: \(error.localizedDescription)")
        }
    })
}
@IBAction func pauseBtnAction(_ sender: Any) {
    self.mediaManager?.pause(completion: { (error:Error?) in
        if let error = error {
            showAlertWith("Pause failed: \(error.localizedDescription)")
        }
    })
}
@IBAction func stopBtnAction(_ sender: Any) {
    self.mediaManager?.stop(completion: { (error: Error?) in
        if let error = error {
            showAlertWith("Stop failed: \(error.localizedDescription)")
        }
    })
}
@IBAction func moveToPositionAction(_ sender: Any) {
    var desiredPosition : Float?
    if let inputText = self.positionTextField.text {
        if let positionInteger = Float(inputText) {
            desiredPosition = positionInteger
        }
    }
    guard let desiredPosition = desiredPosition else { return }
    self.mediaManager?.move(toPosition: desiredPosition, withCompletion: { [weak self] (error:Error?) in
        if let error = error {
            showAlertWith("Move to position failed: \(error.localizedDescription)")
        }
        self?.positionTextField.text = ""
    })
}

In the code above, we implement the following features:

  1. In the playBtnAction: method, we hide the displayImageView image view. Then check the selectedMedia's mediaType object to see if the selected media file is a video. Set the placeholder string of the positionTextField to the video duration and invoke the playVideo:withCompletion: method of DJIMediaManager to start playing the video.

  2. In the resumeBtnAction: method, we invoke the resumeWithCompletion: method of DJIMediaManager to resume the paused video.

  3. In the pauseBtnAction: method, we invoke the pauseWithCompletion: method of DJIMediaManager to pause the playing video.

  4. In the stopBtnAction: method, we call the stopWithCompletion: method of DJIMediaManager to stop the playing video.

  5. In the moveToPositionAction: method, we get the text value of the positionTextField and convert it to an NSUInteger value second. Then invoke the moveToPosition:withCompletion: method of DJIMediaManager to skip to the input position in seconds from the start of the video. Inside the completion block, we clean up the text content of the positionTextField.

Lastly, we can show the video playback state info by implementing the following methods:

func initData() {
    ...
    self.statusView = DJIScrollView.viewWith(viewController: self)
    self.statusView?.isHidden = true
}
@IBAction func showStatusBtnAction(_ sender: Any) {
    self.statusView?.isHidden = false
    self.statusView?.show()
}
//MARK: - DJIMediaManagerDelegate Method
func manager(_ manager: DJIMediaManager, didUpdate state: DJIMediaVideoPlaybackState) {
    var stateString = ""
    stateString.append("Media: \(state.playingMedia.fileName)\n")
    stateString.append("Total: \(state.playingMedia.durationInSeconds)\n")
    let orientationString = self.orientationToString(orientation: state.playingMedia.videoOrientation) ?? "nil"
    stateString.append("Orientation: \(orientationString)")
    stateString.append("Status: \(self.statusToString(status:state.playbackStatus) ?? "nil")\n")
    stateString.append("Position: \(state.playingPosition)\n")
    self.statusView?.write(status: stateString)
}
func statusToString(status:DJIMediaVideoPlaybackStatus) -> String? {
    switch status {
    case DJIMediaVideoPlaybackStatus.paused:
        return "Paused"
    case DJIMediaVideoPlaybackStatus.playing:
        return "Playing"
    case DJIMediaVideoPlaybackStatus.stopped:
        return "Stopped"
    default:
        return nil
    }
}
func orientationToString(orientation: DJICameraOrientation) -> String? {
    switch orientation {
    case DJICameraOrientation.landscape:
        return "Landscape"
    case DJICameraOrientation.portrait:
        return "Portrait"
    default:
        return nil
    }
}

In the code above, we implement the following features:

  1. At the bottom of the initData method, we initialize statusView and hide it. For more details of the DJIScrollView, please check the "DJIScrollView.swift" file in the tutorial's Github Sample project.

  2. In the showStatusBtnAction: method, show the statusView when the users press the Status button.

  3. Implement the delegate method of DJIMediaManagerDelegate. We create a stateStr NSMutableString variable and append different string values to it. Like fileNamedurationInSeconds and videoOrientation of the DJIMediaFile, for more details, please check the "DJIMediaFile" class. Lastly, invoke the writeStatus method of DJIScrollView to show the stateStr NSMutableString in the statusTextView of DJIScrollView.

  4. In the statusToString: and orientationToString: methods, return specific String values according to the values of the DJIMediaVideoPlaybackStatus and DJICameraOrientation enums.

Congratulations! You have finished all the features of this demo. Now build and run the project, connect the demo application to a Mavic Pro and enter the MediaManagerViewController, try to play with the Video Playback features. If everything goes well, you should be able to see something similar to the following gif animation:

Summary

In this tutorial, you have learned how to use DJIMediaManager to preview photos, play videos, download or delete files, you also learn how to get and show the video playback status info. By using the DJIMediaManager, the users can get the metadata for all the multimedia files, and has access to each individual multimedia file. Hope you enjoy it!

Where the brightest people solve the toughest problems to create the greatest future.

570 Kirts Blvd # 211, Troy, MI 48084 🇺🇸

(248) 351-1200

© 1998-2024 RIIS LLC.

Where the brightest people solve the toughest problems to create the greatest future.

570 Kirts Blvd # 211, Troy, MI 48084 🇺🇸

(248) 351-1200

© 1998-2024 RIIS LLC.

Where the brightest people solve the toughest problems to create the greatest future.

570 Kirts Blvd # 211, Troy, MI 48084 🇺🇸

(248) 351-1200

© 1998-2024 RIIS LLC.