Nov 6, 2015

It’s rare during your development career to have the luxury of being able to start with a clean slate every time you begin a new project. More often than not you’re going to have to extend code written by someone else. Other times you’re simply joining the team to help out with the increased workload. Inevitably, the temptation is just not to do any unit testing. After all, it’s a massive task to create unit tests for the existing code, so why bother. But there are ways to approach this “no existing unit tests” scenario so that your code doesn’t fall apart when the application gets to Quality Assurance (QA). “It’s not my code” never was a very good excuse.
The process we take to introduce tests is as follows:
Introduce continuous integration (CI) to build code
Configure Android Studio for TDD (test-driven development)
Add minimal unit tests based on existing tests and get them to run on CI server
Show team how to create unit tests
Add testing code coverage metrics to CI, expect 5-10%
Add Espresso tests
Unit test any new features, while mocking existing objects
Isolate the existing code so nobody can access it directly;
Remove unused code
Refactor isolated code to get code coverage to ideally 60–70%
Whether you’re the sole developer or part of a team it’s always worth setting up a CI server. We looked at Jenkins earlier in an earlier blog, but you can use your own personal favorite as long as it integrates with Android and Gradle. Even if you do this step on it’s own, the team will see benefits.
Next add the JUnit, Mockito, and other dependencies to your project in Android Studio and make sure Studio is on the most recent stable version. Add some simple unit tests and show the team how to create unit tests so they get the general idea; show the team how unit tests work in the CI server. Code coverage at this step will be minimal.
Create Espresso tests for the basic functionality of the existing app—what are known as the primary use cases or happy path. You don’t have the option of internally testing the app, but you can test it at the Activity level. Not doing this will lead to finger pointing if the app starts to fail and erode any confidence you’ve built in the new Agile development environment. Now that you’ve got this in place, create unit tests for any new code.
Don’t edit the old code when adding new features. Isolate any old code so that no new code is added to your existing non-unit-tested/legacy code. Create interfaces to interact with the old code so it has a logical ringed fence around it.
Finally once the development environment is stable you can begin to refactor the old code so that the code coverage is gradually increased over time. We’ll look at how to accomplish this in the rest of this post using a tool called SonarQube.
SonarQube
Our goal is to refactor the code so it’s easier to test and easier to maintain, but this can be problematic. For me Agile is about removing the blame and giving people the skills to implement quality features faster. Telling someone that their code smells isn’t going to be an easy sell no matter how you package it so it’s best to stay objective rather than subjective. Thankfully there are a number of tools and metrics —other than code coverage—that provide this objectivity. SonarQube can be particularly useful to identify real issues with the code.
Install SonarQube as follows:
Download and install SonarQube Server; use the most up to date LTS (long-term support) version, from www.sonarqube.org/downloads/.
Download and install the Sonar Runner.
Start the Sonar Server; run
C:sonarqubebinwindows-x86-xxStartSonar.bat on Windowsor/etc/sonarqube/bin/[OS]/sonar.shConsole on Unix.Go to http://localhost:9000 in your browser to see if the Sonar Dashboard is running see Figure 1).
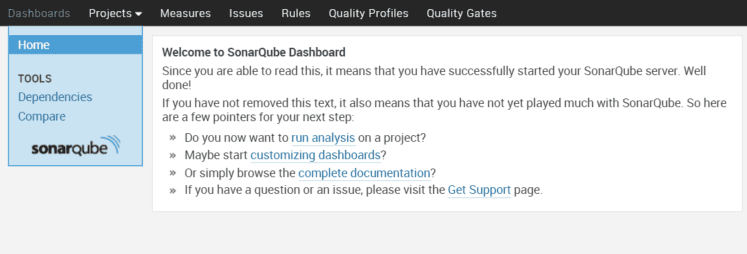
Figure 1. SonarQube Dashboard
We need to check that the server is analyzing projects and the Java plug-in is installed, so download the Sonar examples.
Download the Sonar examples from and unzip.
To get the project information into the Sonar Dashboard we need to use the runner. Navigate to the java example folder and start the runner,
cd C:sonar-examplesprojectslanguagesjavasonar-runnerjava-sonar-runner-simpleand then runC:sonar-runnerbinsonar-runner.bator on unixcd /etc/sonar-examples/projects/languages/java/sonar-runner/java-sonar-runner-simpleand run the/etc/sonar-runner/bin/sonar-runnercommand.Navigate to the Sonar Dashboard, click the Java project and you should see the image in Figure 2.
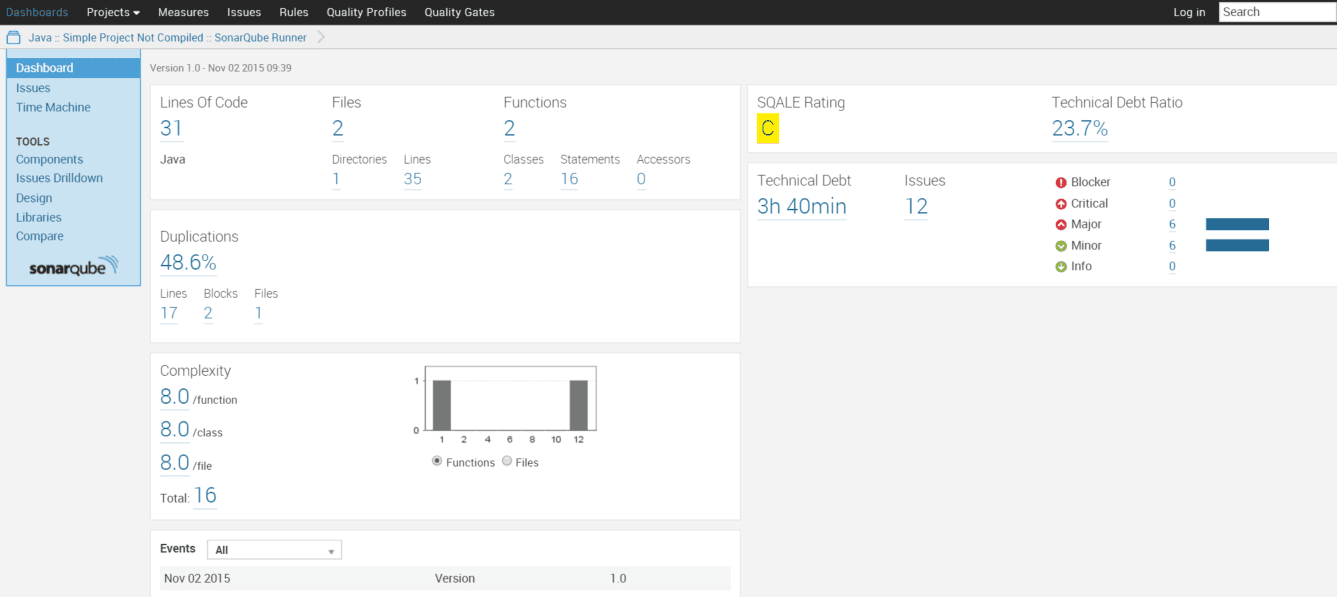
Figure 2. Sonar analytics for our Java project
Note that we’re getting a “C” grade for our Software Quality Assessment based on Lifecycle Expectations (SQLAE). However, we’re not interested in this project as it is Java, not Android. We need to install the Android plug-in before we analyze any of our Android projects.
Log in as Administrator using admin/admin
Click Settings->Update Center->Available Plugins (see Figure 3).
Click the Android Lint plug-in to install the plug-in and restart SonarQube.
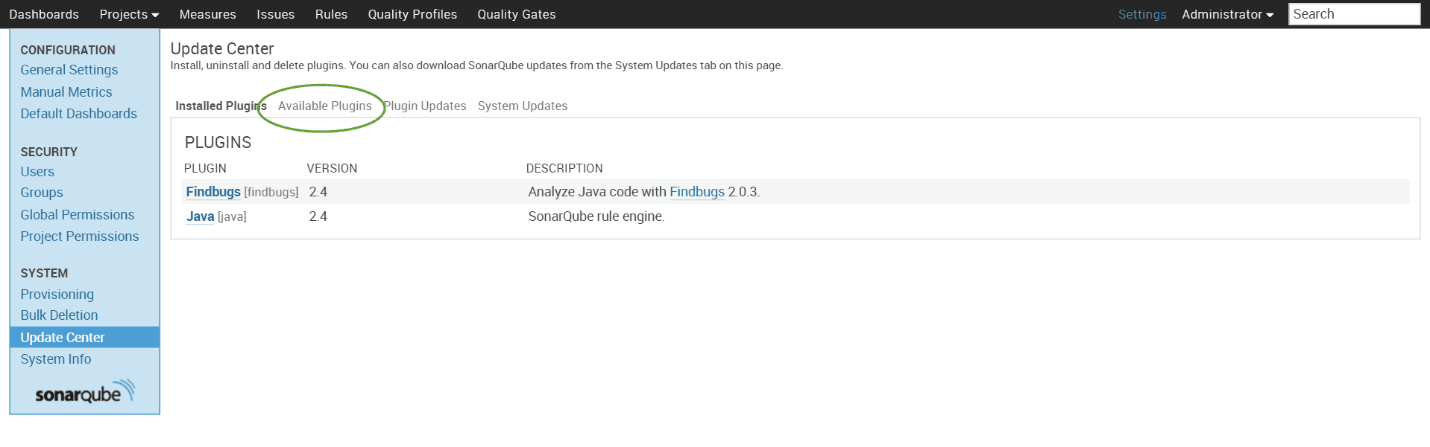
Figure 3. Sonar Update Center
The Android plug-in will import any lint errors into SonarQube as well as allow you to navigate any Java errors. To see the sample Android project, do the following:
cd C:sonar-examplesprojectslanguagesandroidandroid-sonarqube-runneror on unix/etc/sonar-examples/projects/languages/android/android-sonarqube-runnerCreate the bin/classes folder as it fails to load without creating the directory
Run
C:sonar-runnerbinsonar-runner.bator on unix/etc/sonar-runner/bin/sonar-runner
Figure 4 shows the top-level analysis on this basic project.
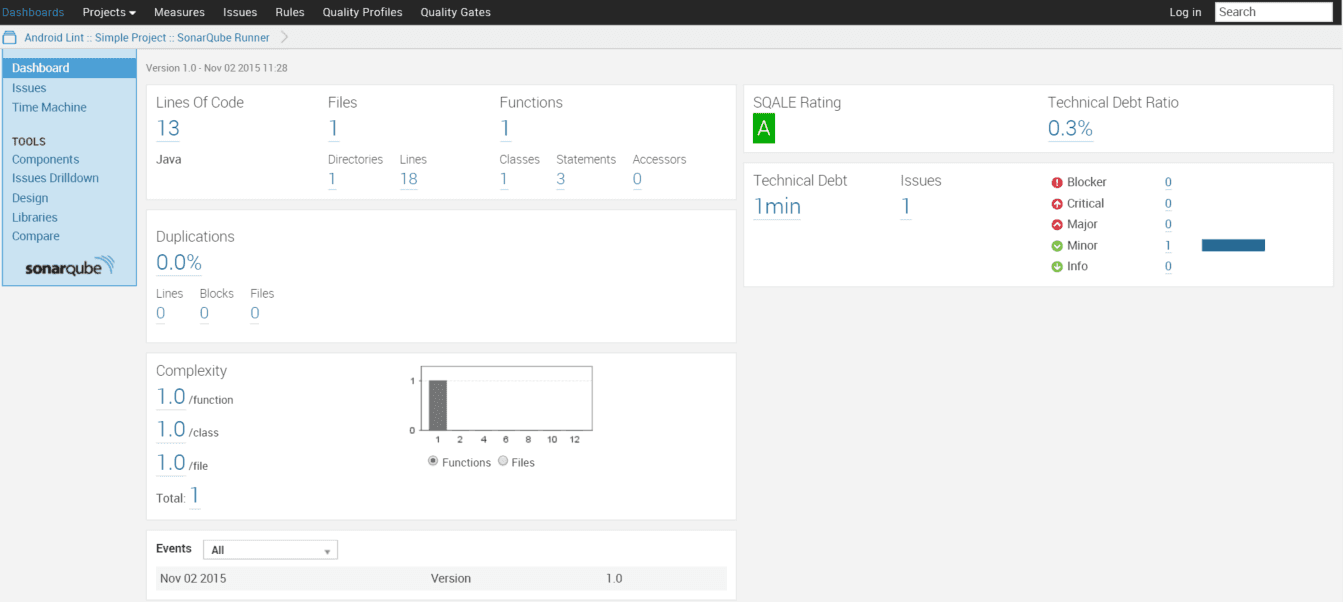
Figure 4. Android app analysis
Install the Tab Metrics plug-in as above and restart SonarQube. Even though it’s on a very small project, when you now click the Issues link (see Figure 5), you should get a flavor of the issues that SonarQube identifies.
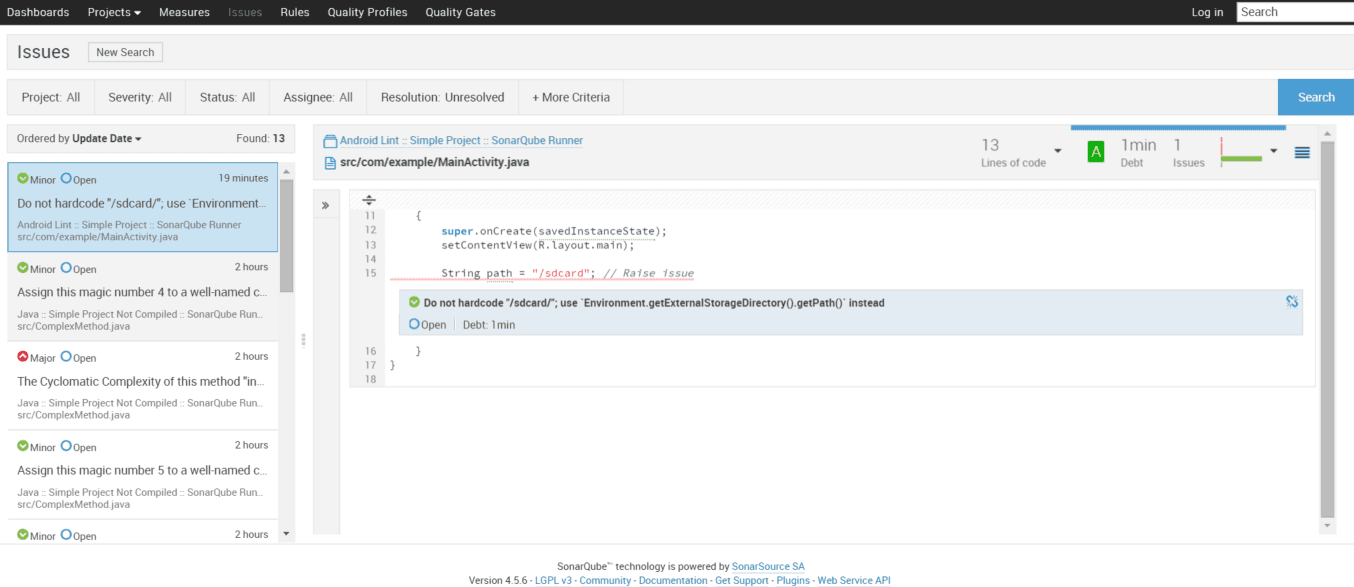
Figure 5. Android app issues list
The Android plug-in works great for Android apps written in Eclipse which will probably be the majority of legacy apps you’re trying to fix. Now that we have that working, we should install the Gradle plug-in so we can analyze Android Studio projects.
Add the plug-in and sonarPropertiesto your build.gradle (app) file, see Listing 1. This won’t replace the existing file but will be in addition to what’s already in the file.
Click Sync Now to update the build.gradle file.
Run your Analyzer command from the project root dir with the command gradlew sonarRunner .
Open the dashboard at http://localhost:9000, to browse your project’s quality.
Listing 1. build.gradle Updates
Figure 6 shows the CropCompare app has almost 200 issues – 47 Critical and 87 Major – that need to be fixed.

Figure 6. CropCompare app issues list
Comparing Projects
When you have got the code coverage up to something that you consider respectable, you might want to use the Sonar compare projects functionality to see how each of the projects compares (see Figure 7). We can quickly identify what projects have poor code coverage and also the high complexity. This will quickly identify other projects that need to undergo the same process.
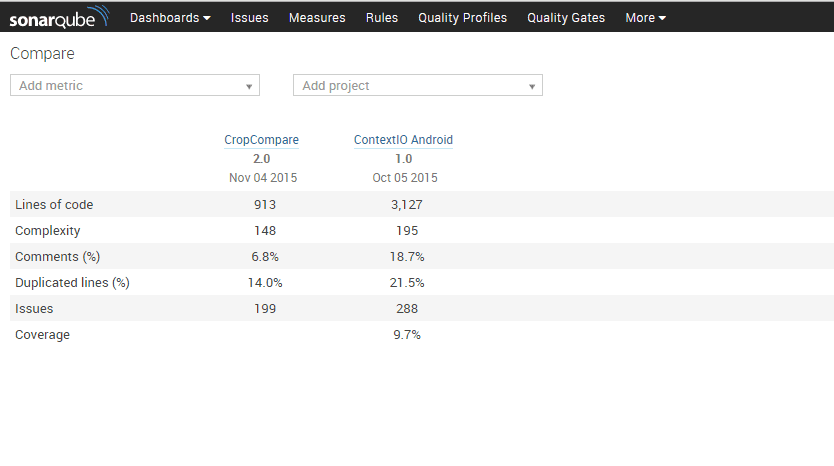
Figure 7. Comparing Projects
Refactor Code
Once you’ve fixed the SonarQube issues, you should have slimmed down the largest classes and removed the critical code smell issues. Remember to test the code using your Espresso test suite after any major surgery to make sure you haven’t broken the build.
Refactoring may also involve creating a new, cleaner architecture for your project. MVP (model-view-presenter) and MVVM (model-view-viewmodel) are both becoming popular Android architectures. Data Binding is another great way to clean up your code—although at time of writing it’s still in beta—as it removes the data references from the user interface or UI and is also a good first step in implementing an MVVM architecture.
Lessons Learned
Before we finish this post it would be a mistake to not talk about a few lessons learned during the transition from poorly written legacy Android code to something more maintainable.
Keep the conversations objective. Telling someone that their code is bad is a very subjective conversation. But telling the team that the goal is to have code coverage and complexity metrics at the same level as the different projects on the company’s git server is a much easier sell.
Don’t ship any tests or test information with your app. It’s unlikely in the current unit testing environment that you’d be able to include unit tests in your APK (Android application package) even if you tried, but we’ve seen many examples of test data being stored in resources and assets folders in the past, so always unzip your production APK to ensure it doesn’t have anything extra in the payload.
Take baby steps when you inherit an existing project. Don’t be driven by metrics. Try not to get too worried about code coverage; after all, you’re being judged on how you write good clean code that delivers value, not if your code coverage or any other metric is more than some specific value.
It’s important to also keep an eye on performance metrics. Just like the Espresso test harness, some simple app timing metrics will keep you on track. There is nothing worse than creating quality-tested code to find it’s two or three times slower than the original legacy code. There is no reason it should be, but mistakes happen so add a performance metric so you can become aware of it (and it can be eradicated) before it becomes an issue.
Add some configuration time to your estimates. If done correctly, manual QA hours should decrease considerably, but this means that the development and devops time will eat up some of that gain. Don’t assume the developers are going to go full on TDD without a configuration learning curve.
Summary
In this post we’ve looked at some strategies for adding unit testing to an existing code base. Using Sonar and refactoring in Android Studio, over time you can gradually decouple existing apps, increase their code coverage, and decrease their complexity.
Finally, it’s worth stating that you don’t need anyone’s permission to unit test, even if the rest of the team does not want to partake. Right now you can start unit testing using Android Studio as there are no longer any impediments to beginning unit testing as the rest of the Java world has been doing for about a decade. With or without TDD, unit testing needs to become part of your development process.
Note a complete set of these testing blogs have been compiled together into an Agile Android mini-book, published by Apress and available from Amazon
This is Part 6 of 6, the remaining blogs can be found below.
Part 1 – Agile Testing on Android
Part 3 – Hamcrest, JaCoCo, Mockito, and Jenkins for Android
Part 4 – Espresso Testing on Android
Part 6 – Maintaining Someone Else’s Android Code
